Pruning
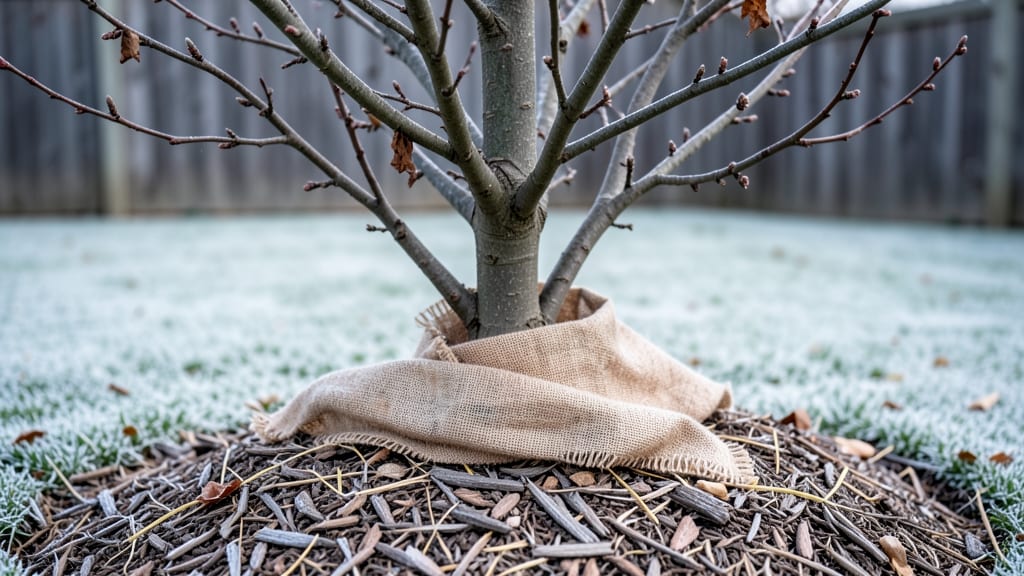
Proper winter care for hibiscus tree begins with strategic pruning—make the right cuts now to ensure vibrant, blooming growth when spring arrives.
I’ve watched my own hibiscus go from frost-nibbled to thriving by following a few key steps, and the secret isn’t complicated: timing, sharp tools, and knowing exactly where to cut. The first frost is coming—don’t wait until it’s too late.
You’ll need pruning shears, a bucket for clippings, and a clear day when temperatures stay above 40°F. The goal is to shape the tree while removing damaged growth, but avoid heavy cuts that stress the plant before winter.
Think of it like giving your hibiscus a warm coat—less about drastic changes, more about protection. Most gardeners in Zones 8-10 can prune now, but those in colder microclimates should wait until late winter.
After pruning, mulch heavily with 3-4 inches of wood chips to insulate roots, and wrap the trunk with burlap if nights dip below 25°F. Water deeply before the ground freezes, then check for winter stress: wilting leaves, cracked bark, or brown stems mean it’s time to adjust.
With this approach, my hibiscus comes back stronger every spring—no more sad, leafless branches staring at me from the patio.
This method works for both tropical and hardy hibiscus varieties in temperate climates. The key difference? Tropical types need extra protection, while hardy ones bounce back faster. Once you’ve pruned and mulched, step back and admire the skeleton of next year’s blooms—it’s the best part of winter gardening.
📚 In This Guide
- What you need
- Instructions
- Tips and common mistakes
- Wrapping up and next steps
What you need
- ● Pruning shears: Bypass pruners (sharp, sterilized with rubbing alcohol) for clean cuts.
- ● Hand pruners: For smaller branches (test for sharpness—blunt tools crush stems!).
- ● Loppers: 6–8" bypass loppers for thicker branches (up to 1.5").
- ○ Hedge shears: Optional for shaping large hibiscus (e.g., Hibiscus rosa-sinensis).
- ● Garden gloves: Heavy-duty, cut-resistant (thorns are no joke!).
- ● Disinfectant: 70% isopropyl alcohol or 10% bleach solution (1 part bleach to 9 parts water).
- ○ Pruning sealant: Optional—tree wound paint (e.g., Tanglefoot Tree Wound Pruning Seal) for cuts >0.5".
- ● Mulch: 2–4" layer of organic mulch (straw, shredded bark, or pine needles).
- ● Frost cloth: Lightweight, breathable frost blanket (50–70% shade coverage).
- ● Stakes & twine: For supporting large branches if needed (e.g., 3/8" garden stakes).
- ● Thermometer: Soil or air thermometer to monitor temps (below 32°F triggers action).
- ● Plant food: Slow-release fertilizer (e.g., 10-10-10) for early spring (apply after pruning).
- ● Potting mix: If repotting indoors, use well-draining mix (e.g., 60% peat/40% perlite).
- ● Grow lights: LED full-spectrum bulbs (12–14 hrs/day) for indoor hibiscus.
- ● Humidifier: Small unit or pebble tray to maintain 50%+ humidity indoors.
Step-by-Step instructions for winterizing your hibiscus tree
Here's how I've kept my Pacific Northwest hibiscus thriving through every winter—no frost damage in sight.
Assess and Prune for Frost Resistance
Start pruning after your first frost when the plant is dormant. Look for dead, diseased, or crossing branches—these are the weak points that invite cold damage. I cut back 1/3 of the plant's height using clean, sharp pruners, making cuts just above a leaf node or outward-facing bud to encourage new growth in spring.
Focus on removing any leggy growth or branches that crowd the center. These areas trap cold air and moisture, creating perfect conditions for fungal issues. If you see any brown, shriveled leaves still clinging, snip them off—they're just holding onto moisture that could freeze and damage the plant.
Apply Protective Mulch and Insulation
Spread a 3-inch layer of organic mulch around the base of your hibiscus, keeping it 6 inches away from the trunk. I use a mix of wood chips and shredded leaves because it insulates the roots while allowing moisture to penetrate. This layer acts like a blanket, protecting roots from temperature swings that can be more damaging than actual frost.
For extra protection in particularly cold microclimates, wrap the trunk and main branches with burlap or frost cloth. Secure it loosely so it doesn't restrict airflow. You'll want to leave the top open like a tent to prevent trapped moisture. This is especially important if you're dealing with 20°F nights or lower.
Water Strategically Before Dormancy
Water deeply 2-3 weeks before your first frost to ensure the plant's roots are full of moisture. This hydration helps the hibiscus withstand cold temperatures better. I give mine about 1 gallon of water per inch of trunk diameter, letting it soak into the soil gradually. The goal is moist but not soggy soil—you should see water draining from the bottom of the root zone.
After this final watering, reduce irrigation completely until spring. Wet soil that freezes expands and can crack roots. I check the soil moisture by pushing my finger 2 inches down—if it's still damp from my initial watering, I know the plant has enough reserves to make it through winter.
Choose Sheltered Location and Windbreaks
If your hibiscus is in a particularly exposed spot, consider moving it to a more sheltered location before winter. Even a 10-foot shift closer to a building or fence wall can make a dramatic difference. I've seen hibiscus trees survive 15°F temperatures when protected from wind chill, which is often more damaging than the actual temperature reading.
For container-grown hibiscus, move pots to a protected area like a garage or under an eave. If you must leave them outside, surround the pot with straw or bubble wrap to insulate the sides. Remember to remove any protective materials in early spring before new growth begins—trapped heat can actually damage emerging buds.
Tips & tricks for perfect winter care of your hibiscus tree
Here's what I've learned from years of keeping my Pacific Northwest hibiscus alive through harsh winters—these small details make all the difference.
Pruning Precision: When you're cutting back that 1/3 of the plant's height in Step 1, focus on removing branches that grow inward or cross each other. These are the ones that create weak points where cold air gets trapped. I also recommend making your cuts at a 45-degree angle just above a leaf node—this helps water run off the cut and prevents rot. Don't forget to sterilize your pruners with rubbing alcohol between cuts to avoid spreading disease.
Mulch Magic: That 3-inch layer of organic mulch in Step 2 isn't just decoration—it's insulation. For extra protection, I like to add a 1-inch layer of straw on top of the mulch in areas where temperatures dip below 20°F. This creates an even better barrier against temperature swings. Just remember to keep it 6 inches away from the trunk to prevent moisture buildup that could lead to fungal issues.
Watering Wisdom: The timing for that 2-3 weeks before first frost watering in Step 3 is critical. I've found that watering in the early morning gives the soil time to absorb moisture before evening temperatures drop. For container-grown hibiscus, you might need to water more frequently since pots dry out faster. After your final watering, I recommend adding a 1-inch layer of coarse sand around the base—this helps with drainage and prevents soil compaction from freezing.
Wind Protection Strategy: That 10-foot shift mentioned in Step 4 can be life-saving. If moving isn't an option, consider installing a temporary windbreak made of burlap or even snow fencing. Wind chill at 15°F can feel like -10°F—that's the difference between survival and damage. For container plants, I've had great success using insulated plant wraps specifically designed for pots, which can add 5-10°F of extra protection.
Pro Tips for Winter Care For Hibiscus Tree
- Here's what I've learned from years of keeping my Pacific Northwest hibiscus alive through harsh winters—these small details make all the difference.
- Pruning Precision: When you're cutting back that 1/3 of the plant's height in Step 1, focus on removing branches that grow inward or cross each other.
- Mulch Magic: That 3-inch layer of organic mulch in Step 2 isn't just decoration—it's insulation.
Frequently asked questions
Got questions about keeping your hibiscus thriving through the Pacific Northwest’s chilly winters? You’re not alone! Here are some of the most common concerns—and straightforward answers—to help you care for your tropical beauty without stress.
How cold can hibiscus trees tolerate before they need winter protection?
Most hibiscus varieties (like Hibiscus rosa-sinensis) struggle when temperatures drop below 25°F (-4°C). In the PNW, where frosts dip into the teens or single digits, you’ll need to protect your tree—whether through mulching, wrapping, or moving potted plants indoors. Hardy hibiscus (like Hibiscus syriacus) can handle 10°F (-12°C), but even they benefit from extra care in harsh winters.
When should I prune my hibiscus for winter in the Pacific Northwest?
Prune after the first frost (typically late fall to early winter) to encourage new growth in spring. Avoid pruning too early—this can stimulate tender shoots that won’t survive cold snaps. For the PNW’s wet, mild winters, aim for November or December before temperatures stabilize below freezing. Pro tip: Sterilize your tools with rubbing alcohol to prevent disease spread!
Can I keep a potted hibiscus outdoors over winter, or should I bring it inside?
If your hibiscus is in a large, insulated pot (15+ gallons), you can wrap it in burlap or frost cloth and place it in a sheltered spot (like against a south-facing wall). However, for smaller pots or severe PNW winters, move it indoors to a bright, cool spot (50–60°F / 10–15°C). Avoid drafts or heating vents, which can stress the plant. Bonus: Reduce watering to prevent root rot!
What’s the best way to prune a hibiscus for winter—should I cut back hard or lightly?
For tropical hibiscus, prune 1/3 of the plant, focusing on:
- Dead or diseased branches (cut to the nearest healthy node).
- Crossing or weak growth to improve airflow.
- Avoid over-pruning—this can shock the plant and delay spring blooms.
My hibiscus leaves are yellowing or dropping—is this normal in winter, or am I doing something wrong?
Some leaf drop is normal due to dormancy or cold stress, but excessive yellowing often signals:
- Overwatering (hibiscus hate soggy roots—let soil dry slightly between waterings).
- Underwatering (wilted leaves mean it’s thirsty!).
- Fungal issues (like powdery mildew—improve airflow and avoid wet foliage).
- Nutrient deficiency (feed with a balanced fertilizer in early spring).
Wrapping up and next steps
With the right winter care, your hibiscus can thrive even in the chilly Pacific Northwest! Remember to prune strategically before frost, protect young plants with mulch and wraps, and monitor moisture to keep roots happy.
A little prep now means vibrant blooms come spring—so roll up your sleeves and give your hibiscus the love it deserves! 🌿✨
Ready to take action? Grab your pruners and start planning your hibiscus’s winter makeover today—your future garden will thank you!