
Pruning
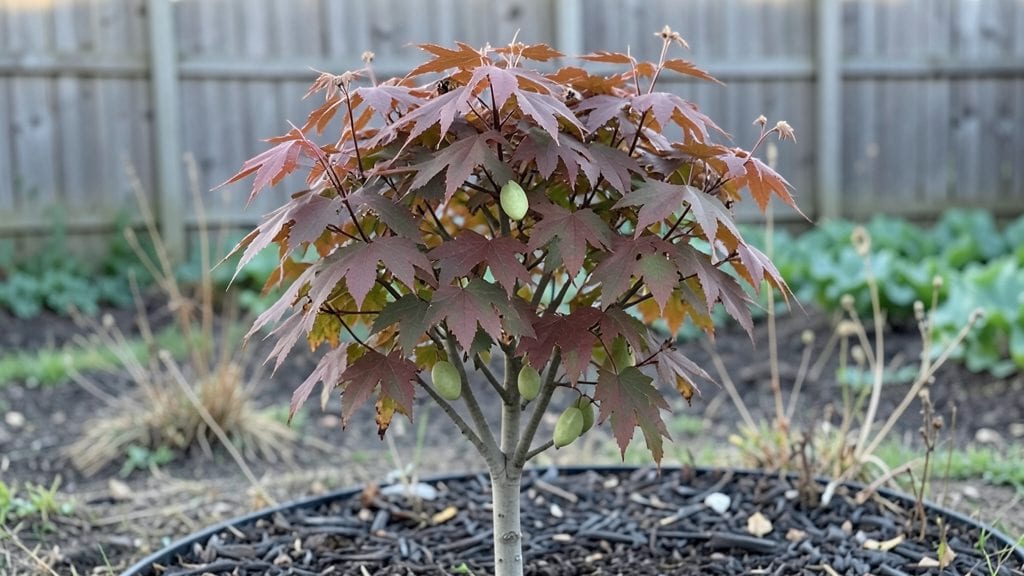
A mini red maple tree brings bold color to small spaces without the commitment of a full-sized tree. I’ve grown these fiery beauties in my Pacific Northwest yard for years, and they’ve never failed to deliver—even through our damp winters.
Their compact size makes them perfect for urban gardens, patios, or even large containers, while their brilliant red foliage turns ordinary landscapes into showstoppers.
These trees thrive in partial shade to full sun, making them adaptable to tricky spots where bigger trees would struggle. They prefer well-draining soil but aren’t fussy—just avoid waterlogged areas.
Water deeply once established, and you’ll see vibrant new growth every spring. Pruning is minimal, mostly just removing dead branches or shaping in early spring before buds break.
What makes them truly special is their year-round appeal: deep red leaves in summer, fiery fall colors, and even winter interest with their striking bark.
In just a few years, you’ll have a tree that’s as low-maintenance as it is stunning—ideal for gardeners who want impact without the upkeep of a traditional maple.
They’re also surprisingly cold-hardy, surviving down to zone 5, so they’re a reliable choice for cooler climates. Whether you’re filling a corner in your yard or adding a pop of color to a balcony, this tree delivers big results with minimal effort. Let’s get yours planted!
📚 In This Guide
- What you need
- Instructions
- Tips and common mistakes
- Wrapping up and next steps
What you need
- ● Pruning shears: Bypass pruners (sharp, 5–8-inch blades) for clean cuts on small branches.
- ● Loppers: 16–24-inch for thicker branches (up to 2 inches in diameter).
- ● Pruning saw: Curved-tooth hand saw for branches over 2 inches thick.
- ● Gloves: Heavy-duty, cut-resistant (e.g., leather or synthetic blend) to protect hands from thorns.
- ● Disinfectant: 70% isopropyl alcohol or rubbing alcohol to sterilize tools between cuts.
- ● Rake or broom: For clearing fallen leaves/debris post-pruning.
- ● Watering can or hose: Light spray nozzle for post-pruning hydration.
- ○ Pruning sealant (optional but helpful): Tree wound dressing (e.g., Tanglefoot Tree Wound Pruning Seal) for large cuts.
- ● Extension pole: For hard-to-reach branches (10–12 feet).
- ● Ladder: Sturdy, non-slip (3–4 feet) for safety if needed.
- ● Work gloves: Garden gloves for extra grip and protection.
- ● Trash bags: For collecting pruned branches and debris.
- ● Notebook/pencil: To sketch pruning plans or mark branches for removal.
Step-by-Step guide to planting and caring for a mini red maple tree
Here’s how to establish your compact red maple for decades of vibrant fall color and winter interest.
Choose the Right Location for Year-Round Beauty
Select a spot with 6+ hours of sunlight daily, though mini red maples tolerate partial shade better than full sun. In the Pacific Northwest’s cooler climate, they thrive in USDA Zones 5-8, making them perfect for Portland to Seattle gardens. Avoid low spots where cold air pools—these trees hate soggy roots.
Test the soil by digging a 6-inch hole. If it’s heavy clay (common in PNW), amend with 3 inches of compost to improve drainage. The ideal spot balances sun exposure with protection from harsh winds, which can stress young trees. I always plant mine near a foundation or patio where I’ll enjoy their seasonal changes daily.
Dig and Prepare the Planting Hole
Dig a hole twice as wide as the root ball but no deeper—this prevents water pooling at the base. Loosen the sides of the hole with a shovel to encourage root spread. For a 5-gallon container-grown mini maple, the hole should be about 18 inches wide and 12 inches deep.
Gently remove the tree from its container and tease the roots outward if they’re circling. Place it in the hole so the top of the root ball sits 1 inch above ground level—this prevents rot during heavy rains. Backfill with native soil mixed with 1 part compost to improve fertility without overwhelming the tree.
Water Deeply and Mulch for Winter Protection
Water immediately after planting to settle the soil and eliminate air pockets. Use 5 gallons of water for a 5-gallon tree, soaking the root zone until it drains from the bottom. In the PNW’s damp climate, mulch with 2-3 inches of wood chips or bark, keeping it 6 inches away from the trunk to prevent rot.
Mulch retains moisture and insulates roots during winter freezes. Reapply mulch annually in late fall to maintain protection. Avoid over-mulching—too much suffocates the tree and attracts pests. I check mulch depth every spring and top off if it’s broken down below 2 inches.
Prune for Shape and Health in Early Spring
Wait until late March or early April, after new growth begins but before leaves emerge, to prune. Remove any dead, crossing, or weak branches with clean cuts just outside the branch collar. For a mini maple, limit pruning to 20% of the canopy—these trees are naturally compact and don’t need heavy pruning.
Shape the tree by opening the center to improve air circulation, which reduces disease risk. I always sterilize pruners with rubbing alcohol between cuts to prevent bacterial spread. Avoid pruning in fall or winter—PNW’s wet conditions make cuts slow to heal, inviting infections.
Fertilize and Monitor Through the Seasons
Apply a balanced 10-10-10 fertilizer in early spring, using ½ cup per inch of trunk diameter. Water thoroughly before and after to prevent root burn. Skip fertilizer in the first year if planting a container-grown tree—its roots are already established in the pot’s soil.
Watch for yellowing leaves, which often signal overwatering or nutrient deficiency. In the PNW’s rainy season, ensure the planting site has good drainage—mini maples hate "wet feet." I inspect my trees monthly for pests like aphids or scale, treating with horticultural oil if needed. With proper care, your mini red maple will reward you with vibrant red foliage in fall and striking bark texture in winter.
Tips & tricks for perfect mini red maple tree planting
A few key strategies will help your mini red maple thrive for years to come in the Pacific Northwest's unique climate.
Soil Preparation: In Step 1, when you test your soil, pay special attention to drainage—these trees absolutely despise soggy roots. If you're in heavy clay soil, mix in that 3 inches of compost right into the bottom of the hole, not just around the edges. I've seen too many mini maples fail because their roots couldn't escape wet conditions. For extra insurance, consider adding a handful of perlite to the backfill mix.
Root Ball Placement: Step 2's instruction about placing the root ball 1 inch above ground level is crucial, but here's why: This creates a slight mound that prevents water from pooling against the trunk during our rainy season. After planting, gently firm the soil around the edges to eliminate air pockets, then water thoroughly to settle everything. I tap the sides of the hole lightly with a shovel handle to help compact the soil without damaging roots.
Mulching Technique: The 2-3 inches of mulch in Step 3 should be applied carefully—think of it as insulation for your tree's roots. I use wood chips because they break down slowly, but avoid fresh wood mulch which can rob nitrogen from the soil. Create a donut shape around the trunk, keeping that 6-inch clearance to prevent moisture buildup that leads to rot. In winter, add an extra inch of mulch for protection against freezing temperatures.
Pruning Timing: That late March to early April window in Step 4 is perfect for PNW's climate because it coincides with the tree's natural growth cycle. When pruning, look for branches that cross or grow inward—they'll create weak points where pests can enter. I always make my cuts just outside the branch collar, then immediately sterilize my pruners with rubbing alcohol to prevent spreading any potential infections between cuts.
Pro Tips for Mini Red Maple Tree
- A few key strategies will help your mini red maple thrive for years to come in the Pacific Northwest's unique climate.
- Soil Preparation: In Step 1, when you test your soil, pay special attention to drainage—these trees absolutely despise soggy roots.
- After planting, gently firm the soil around the edges to eliminate air pockets, then water thoroughly to settle everything.
Frequently asked questions
How fast does a mini red maple tree grow?
A mini red maple typically grows 12–24 inches per year, reaching maturity (15–25 feet tall) in about 10–15 years. In the PNW’s cooler climate, expect slower growth in winter but steady progress in spring/summer. Pro tip: Prune in late winter to encourage healthy, controlled growth!
Can a mini red maple survive PNW winters?
This tree is USDA Zone 3–8 hardy, meaning it thrives in the PNW’s cold winters (down to -40°F). Just ensure it’s planted in well-draining soil and avoid waterlogging. Mulch around the base in fall to protect roots from freezing.
When’s the best time to prune a mini red maple?
Prune in late winter or early spring (before buds swell) to remove dead branches and shape the tree. Avoid heavy pruning in fall—it can stress the tree before winter. Warning: Never prune during wet weather, as it increases disease risk.
What if my mini red maple’s leaves turn yellow?
Yellow leaves often signal overwatering, nutrient deficiency, or fungal issues. Check soil moisture (it should be evenly damp, not soggy) and fertilize lightly in early spring. If spots appear, treat with neem oil for fungal control. Pro tip: Test soil pH—mini maples prefer slightly acidic (6.0–7.0).
Can I grow a mini red maple in a container?
Yes! Choose a large pot (at least 18 inches deep) with drainage holes and use well-draining potting mix. Container-grown trees need regular watering (check soil weekly) and winter protection (move to a sheltered spot or wrap the pot in burlap). Repot every 2–3 years for root health.
Wrapping up and next steps
Growing a mini red maple tree in the Pacific Northwest isn’t just about adding beauty—it’s about embracing a resilient, year-round stunner that thrives in your climate!
With the right pruning techniques and care, you’ll keep its vibrant foliage healthy and its growth vibrant for seasons to come. Now’s the perfect time to roll up your sleeves and give your tree the TLC it deserves!
🌿 Next steps:
- Schedule your first pruning session in early spring to encourage fresh growth.
- Monitor your tree’s health and adjust care as needed—your green thumb is growing!
- Share your progress with fellow gardeners (or tag us on social media—we’d love to see it!).