Pruning
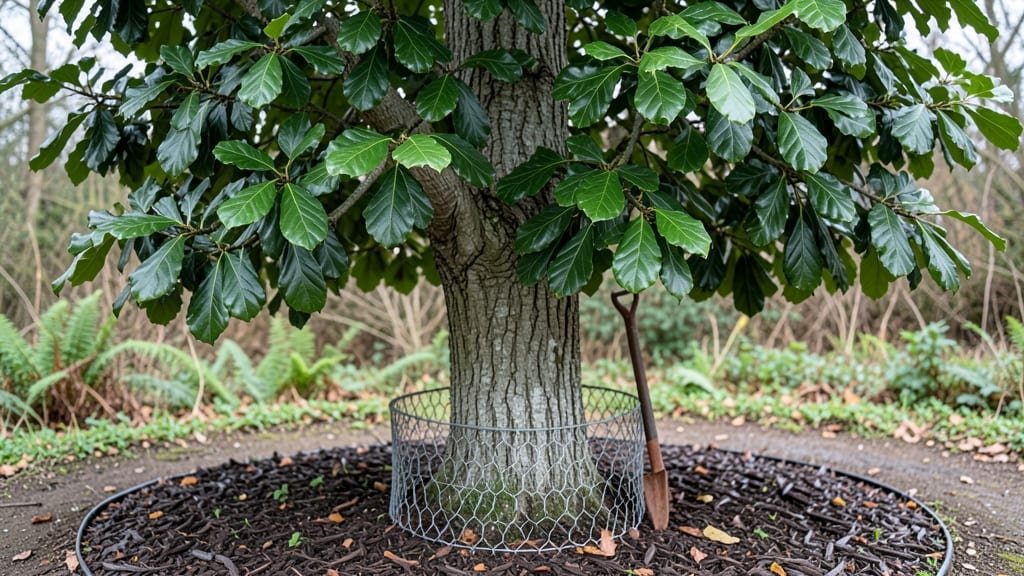
A mesh tree guard saved my young oak from becoming a deer buffet last winter. 🌳 The moment I saw the ragged bark where deer had stripped the trunk, I knew I needed a physical barrier—fast.
These flexible, breathable sleeves are the unsung heroes of tree protection, stopping rodents, rabbits, and even deer from chewing bark while letting rain and air reach the trunk.
You don’t need fancy tools—just a pair of scissors, some zip ties, and a guard that fits snugly around the trunk. Start with 12–18 inches of height for young trees, extending it as they grow.
The key is securing it tight enough to deter pests but loose enough to avoid girdling (where the guard cuts into the bark over time). I’ve tried stiff plastic guards before, but mesh bends with the tree’s movement, so it lasts seasons without damage.
What you’ll gain is peace of mind—and a tree that grows strong instead of stunted. No more chewed bark, no more sap oozing from wounds, and no more watching your investment turn into a snack bar.
Plus, the guards disappear into the landscape, blending in better than plastic or wire alternatives. Once installed, check them twice a year for tears or pests inside, and you’re set for years of protection.
Not all trees need guards—mature bark or species like maples and oaks are prime targets, while fruit trees or thin-barked plants benefit most. If you’re in a high-predator area, consider extending the guard’s height by 6–12 inches every few years.
For smaller trees, a 3-foot guard is often enough to stop most critters cold. The investment is small compared to losing a tree entirely.
📚 In This Guide
- What you need
- Instructions
- Tips and common mistakes
- Wrapping up and next steps
What you need
- ● Hardware cloth or mesh: 1/4-inch (6mm) or 1/2-inch (12mm) mesh (most effective for deterring rodents and rabbits)
- ● Minimum length: 4–6 feet taller than the tree (e.g., 8–10 feet for a 4-foot sapling)
- ● Width: 3–4 feet (enough to wrap snugly around the tree’s circumference)
- ● Measuring tape – For precise cutting and fitting.
- ● Heavy-duty stapler or staples – To secure the mesh tightly (galvanized staples resist rust).
- ● Scissors or tin snips – For cutting mesh cleanly.
- ● Wooden stakes or rebar – 4–6 stakes (6–12 inches long) to anchor the guard.
- ○ Ziploc bags or plastic sheeting – Optional, for wrapping the base to deter burrowing pests.
- ● Wire or cable ties – For extra reinforcement at seams or stake connections.
- ● Burlap or landscape fabric – To wrap the base and blend the guard into the soil.
- ● Paint or reflective tape – To camouflage the guard and reduce visibility to pests.
- ● Gloves – For handling sharp mesh or thorny branches.
How to install a mesh tree guard for pest protection
Here’s how I protect young trees from deer, rabbits, and rodents—without harming wildlife or using harsh chemicals.
🪴 Step 1: Measure and Cut the Mesh Guard to Fit
Start by measuring the trunk’s circumference at the base and every 12 inches up to 6 feet (or the height of the guard you’re using). Most mesh guards come in 4-foot lengths, so you may need two sections per tree. Mark the mesh with a fabric marker where it overlaps by 2-3 inches—this ensures pests can’t chew through gaps.
Use heavy-duty scissors or tin snips to cut the mesh cleanly along your marks. Avoid tearing the edges, as rough cuts can snag bark or allow pests to slip through. I like to test-fit the guard around the trunk before securing it—this helps spot any awkward bends or overlaps you’ll need to adjust.
🌱 Step 2: Secure the Guard Without Damaging the Tree
Wrap the mesh tightly around the trunk, starting at the base. Use plastic-coated tree ties (not wire or zip ties) to fasten it every 12-18 inches. These ties stretch slightly as the tree grows, preventing the guard from cutting into the bark. Pull the mesh snug but not so tight it restricts the trunk’s expansion—you should be able to slide a finger between the guard and bark.
For extra stability, especially on windy days, I add a second layer of ties at a 45-degree angle to the first. This creates a crisscross pattern that keeps the mesh from shifting. Avoid using staples or nails—they’ll damage the tree as it grows, and the guard will need replacing sooner.
☀️ Step 3: Extend Protection to the Root Flare
Most pests target the base of the tree where the trunk meets the soil. Bury the bottom 6 inches of the mesh guard 2-3 inches deep around the root flare (the swollen area at the tree’s base). This stops burrowing animals like voles or gophers from chewing through the roots. Use a shovel to create a shallow trench, then tuck the mesh into it and cover with soil.
For added defense, I sprinkle gravel or coarse sand around the buried section. This deters digging pests and makes it harder for them to tunnel under the guard. Water the area lightly afterward to settle the soil—this prevents gaps where pests could slip through.
✂️ Step 4: Monitor and Adjust as the Tree Grows
Check the guard every 3-4 months to ensure it’s still snug and intact. Trees grow faster than you’d expect—if the mesh starts to sag or gape, secure it again with new ties. I mark the height of the guard with a pencil on the tree so I can tell at a glance if it needs extending upward.
Remove the guard once the trunk reaches 4-5 inches in diameter—most pests lose interest in trees this thick. If you leave it on too long, the ties can girdle the bark as the tree expands. When removing, cut the ties carefully to avoid stripping the bark, then fold the mesh guard for reuse on another tree.
Tips & tricks for perfect mesh tree guard installation
Here's what I learned after protecting dozens of trees—these small details make all the difference between a guard that works and one that fails.
Precision Cutting: When marking your mesh overlaps in Step 1, use a straightedge or ruler to draw perfectly straight lines. The 2-3 inch overlap is critical—any less and pests can chew through, any more creates unnecessary bulk. I like to fold the mesh along my marked lines before cutting to ensure clean edges that won't snag bark.
Tree Tie Technique: In Step 2, don't be afraid to use more than the minimum 12-18 inch spacing between ties, especially for taller trees. I often add an extra tie at every 12 inches for the first 3 feet of the guard where most damage occurs. The crisscross pattern isn't just decorative—it prevents wind from pushing the mesh against the bark.
Root Protection Pro Tip: For Step 3, if you're working with very loose soil, consider adding a 1-inch layer of hardware cloth (not just mesh) at the very base before burying. This creates an extra barrier against mole and gopher attacks. I've seen them dig right through regular mesh when motivated enough!
Growth Monitoring: The 3-4 month check interval in Step 4 is perfect timing—this matches when most trees have their biggest growth spurts. Use a soft pencil to mark the current height of your guard on the tree trunk. When you see the pencil mark disappear under new bark growth, it's time to extend upward.
Pro Tips for Mesh Tree Guard
- Here's what I learned after protecting dozens of trees—these small details make all the difference between a guard th...
- Precision Cutting: When marking your mesh overlaps in Step 1, use a straightedge or ruler to draw perfectly straight ...
- Tree Tie Technique: In Step 2, don't be afraid to use more than the minimum 12-18 inch spacing between ties, especial...
Frequently asked questions
Got questions about mesh tree guards? You’re not alone! Here’s what homeowners and gardeners ask most often—plus straightforward answers to help you decide if these protective barriers are right for your trees.
What types of pests do mesh tree guards actually protect against?
Mesh tree guards are most effective against gnawing pests like rabbits, deer, rodents (squirrels, mice, voles), and even porcupines. They also deter bark-beetles and sapsuckers. For larger animals (e.g., bears or moose), opt for heavier-duty materials or larger-diameter guards.
How long should I leave a mesh tree guard on my tree?
Most experts recommend keeping mesh guards on for 1–2 growing seasons (spring to fall). Remove them before winter to prevent snow damage or moisture buildup. If pests return year after year, replace the guard or switch to a more permanent solution like tree wraps or repellents.
Are mesh tree guards a one-time purchase, or do I need to replace them?
Mesh guards are reusable for 3–5 years if stored properly (dry, clean, and away from UV). However, if they tear, degrade, or get chewed through, replace them. Check for wear annually—especially after harsh winters or stormy seasons.
What’s a good alternative if mesh guards aren’t working?
If pests persist, try these alternatives:
- Tree wraps (burlap or plastic) to confuse gnawers.
- Repellents like hot pepper spray or commercial animal deterrents.
- Physical barriers like chicken wire fencing around the base.
- Companion planting (e.g., garlic or marigolds) to repel rodents.
Can mesh tree guards harm my tree if left on too long?
Yes! Prolonged use (beyond 2 years) can restrict trunk growth or trap moisture, leading to rot or disease. Always ensure the guard fits snugly (not too tight) and remove it once the tree’s bark hardens. Monitor for signs of stress like discoloration or stunted growth.
Still unsure? Pro tip: Test a small section of your yard first—place a guard on one tree and compare its growth to an unprotected one over a season!
Wrapping up and next steps
Protecting your trees from pests like rabbits, deer, and rodents doesn’t have to be a constant battle—mesh tree guards offer a simple, effective, and eco-friendly solution!
By wrapping your young trees in durable mesh, you’re giving them the best chance to grow strong and healthy without the stress of gnawing damage. 🌱
Ready to take action? Start by assessing your trees’ needs, gathering the right materials, and installing your guards before the next pest season hits. Your trees—and future shade—will thank you! 🌳✨