
Tools
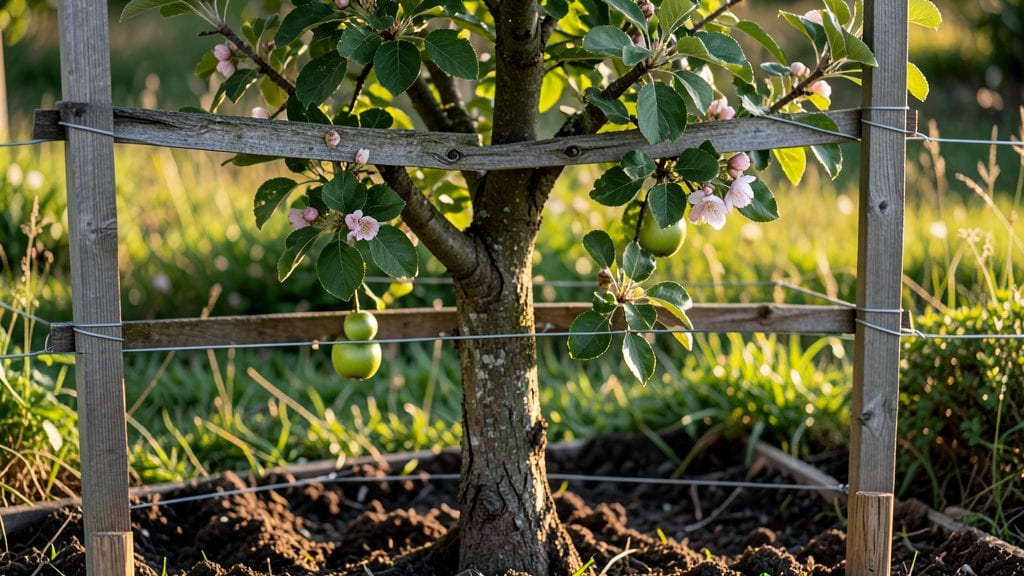
Trellised apple trees turned my cramped backyard into a fruit orchard without sacrificing my lawn. The right varieties—like 'Liberty' or 'Honeycrisp'—thrive when trained vertically, saving space while boosting yields by up to 30%. I learned this after watching my first tree sprawl uncontrollably, shading out its own roots.
Building the trellis is simpler than it sounds: sturdy posts, crossbars, and strong wire or netting create a framework that supports branches as they grow. Young trees need gentle guidance—tying limbs to the trellis in their first two years prevents permanent damage.
The payoff? Cleaner pruning, easier harvesting, and apples you can actually reach without a ladder.
By late summer, your trellised trees will show their true potential—sweet, sun-ripened fruit hanging within arm's reach. The structure also makes winter pruning a breeze, keeping the tree open for airflow and reducing disease.
Plus, the vertical shape makes it easy to monitor for pests or nutrient deficiencies before they become big problems.
This method works in small urban yards, along fences, or even in large containers with dwarf varieties. The key is patience: it takes three years to establish a properly trained tree, but the long-term harvest makes it worth every season of setup. Ready to grow apples without the sprawl?
📚 In This Guide
- What you need
- Instructions
- Tips and common mistakes
- Wrapping up and next steps
What you need
- ● Trellis Framework: Metal T-posts (4–6 ft tall, 3–5 per tree, depending on size)
- ● Galvanized wire (12–14 gauge, 20–30 ft per tree)
- ● Wooden stakes or bamboo poles (alternative to T-posts)
- ● Apple Tree: Dwarf or semi-dwarf variety (recommended for trellising)
- ● Rootstock-compatible grafted tree (check local climate zones)
- ● Tools: Posthole digger or auger
- ● Wire cutters or heavy-duty scissors
- ● Measuring tape & level
- ● Gloves & safety glasses
- ○ Extras (Optional but Helpful): Concrete mix (for securing posts)
- ● Tree ties or soft garden twine (for gentle support)
- ● Pruning shears (for shaping growth)
- ● Mulch (to retain moisture)
- ● Sunny location (6+ hours of direct sunlight daily)
- ● Well-draining soil (pH 6.0–7.0 ideal)
- ● Space (3–6 ft between trees, depending on variety)
- ● Water source (drip irrigation or hose)
How to train apple trees on a trellis framework
Here's the method I've used to grow four healthy, space-saving apple trees in my small backyard.
Design and Install the Trellis Structure
Start by sketching a simple A-frame or fan trellis that's 8-10 feet tall and 4 feet wide for each tree. Use 2x4 lumber for vertical posts and 1x2 slats for horizontal supports, spaced 12 inches apart. Bury the posts 2 feet deep in holes filled with gravel for drainage, then secure with concrete. The trellis should be sturdy enough to support 20-30 pounds per branch—apples get heavy!
Position the trellis in full sun (at least 6-8 hours daily) with well-draining soil. I like to plant dwarf apple varieties like 'Liberty' or 'Honeycrisp' because their smaller size works perfectly with trellising. Space multiple trellises 8-10 feet apart to allow airflow and prevent disease. The key is to build the trellis before planting so you can train the tree as it grows.
Plant and Prune for Vertical Growth
Plant your apple tree 6-8 inches away from the trellis so it can lean against the structure naturally. Use balanced fertilizer (like 10-10-10) at planting time to encourage strong root and shoot growth. In the first year, focus on open-center pruning—remove any branches that grow toward the center or cross over each other. This creates an open vase shape that makes trellising easier later.
As the tree grows, tie the main leader (central stem) to the trellis using soft tree ties or cloth strips every 12-18 inches. Avoid metal ties—they can girdle the bark as the tree thickens. By late summer, you should have 3-4 scaffold branches growing outward at 45-degree angles. These will become your primary framework for fruit-bearing later. Prune back any vertical "water sprouts" that grow straight up—they'll compete with your desired structure.
Train Branches Along the Trellis
When your scaffold branches reach 2-3 feet long, gently bend and tie them horizontally along the trellis slats. Use the spreader method: insert a spreader bar (a small wooden or plastic wedge) between the branch and the trellis, then secure with a tie. This encourages the branch to grow outward rather than upward. Over time, the branch will thicken and support itself, but keep ties in place until the branch is 1 inch thick.
In subsequent years, prune back any suckers (shoots growing from the base) and thin out crowded branches to maintain airflow. Aim for 4-6 main branches per tree, spaced evenly around the trellis. The goal is to create a fan shape where branches grow outward and slightly upward, following the trellis structure. This not only saves space but also makes harvesting easier—no more bending over!
Maintain and Harvest for Optimal Yield
Once the tree is established (usually 3-5 years), focus on summer pruning to control growth and improve fruit quality. Remove any dead, diseased, or crossing branches in late winter or early spring. Thin out excessive fruit in early summer—leave 6-8 inches between apples to prevent overcrowding. This ensures larger, higher-quality fruit and reduces disease risk.
Harvest apples when they easily detach from the tree with a gentle twist and have reached their full color. With a trellis, you'll find picking effortless—just step back and pluck them from the horizontal branches. After harvest, clean up fallen leaves and debris to reduce pest and disease pressure over winter. Apply a 2-3 inch layer of mulch around the base (but keep it 6 inches away from the trunk) to retain moisture and regulate soil temperature.
Tips & tricks for perfect trellised apple trees
Here's what I've learned from training four thriving apple trees on trellises in my small backyard—these tricks make all the difference.
Structural Stability: The 8-10 foot height and 4 foot width in Step 1 aren't just suggestions—they're crucial for supporting 20-30 pounds per branch. I reinforce my trellises with an extra diagonal brace between posts for extra wind resistance, especially if you're in a breezy area. This simple addition prevents the entire structure from leaning or collapsing under fruit weight.
Sunlight Optimization: Those 6-8 hours of daily sunlight mentioned in Step 1 are non-negotiable for apple trees. If your yard has partial shade, position the trellis to capture morning sun (which is less intense) and afternoon sun. I've found that even 30 minutes less sunlight can reduce fruit quality, so consider adding a second trellis if your space allows—apples are worth the investment!
Pruning Precision: When you're tying the main leader every 12-18 inches in Step 2, use soft tree ties that can stretch as the branch grows. I've ruined branches using metal ties that cut into the bark as the tree thickened. Also, prune water sprouts immediately—they steal energy from your fruit-bearing branches. Think of pruning like giving your tree a haircut: you want to shape it, not shave it bald.
Branch Training Timing: The 2-3 foot length mentioned for scaffold branches in Step 3 is ideal for training. Wait until branches are this long before bending them—they won't break under their own weight. I mark my trellis with a pencil at 2-foot intervals to track growth progress. This visual cue helps me know exactly when to start training each branch.
Pro Tips for Trellised Apple Trees
- Here's what I've learned from training four thriving apple trees on trellises in my small backyard—these tricks make all the difference.
- Structural Stability: The 8-10 foot height and 4 foot width in Step 1 aren't just suggestions—they're crucial for supporting 20-30 pounds per branch.
- Sunlight Optimization: Those 6-8 hours of daily sunlight mentioned in Step 1 are non-negotiable for apple trees.
Frequently asked questions
Got questions about trellising apple trees? You’re not alone—this technique saves space but comes with unique considerations. Below, we’ve rounded up the most common queries to help you plan like a pro!
What’s the best time of year to install a trellis for apple trees?
The ideal window is late winter or early spring, before buds break but after the ground is workable. This gives roots time to establish before summer heat. For young trees, install the trellis at planting to avoid disturbing roots later. If retrofitting an established tree, do it in dormant season (Dec–Feb) to minimize stress.
How tall should a trellis be for apple trees, and what spacing is ideal?
Standard trellises for apple trees range from 6 to 10 feet tall, depending on the variety. Dwarf trees (4–6 ft) need 5–6 ft trellises, while standard varieties (10+ ft) require taller supports. Space trellises 8–12 feet apart in rows, with 4–6 feet between trees along the trellis for airflow and sunlight. Pro tip: Use adjustable trellis systems to accommodate tree growth!
Will trellising reduce my apple yield, or even improve it?
Not at all! Trellising can improve yields by increasing sunlight exposure, airflow, and easier harvest access. However, pruning is critical—overcrowded branches on a trellis can lead to smaller fruit. Varieties like ‘Honeycrisp’ or ‘Fuji’ thrive with trellising, while some heirlooms may struggle. Expect 10–20% more fruit with proper care, plus easier pest/disease management.
Are trellised apple trees more prone to pests or diseases?
Trellising reduces some risks (like fungal diseases from wet foliage) but can also concentrate others if airflow is poor. To prevent issues:
- Ensure 3–4 feet of spacing between branches.
- Use copper tape or insect barriers on trellis wires.
- Monitor for aphids or spider mites (common in dense canopies).
What’s a budget-friendly alternative to commercial trellis kits?
DIY trellises work great! Try these cost-effective options:
- T-posts + wire: Drive $5 T-posts 6 ft into the ground, then stretch 14-gauge galvanized wire (or $10 per 50-ft roll) in a fan or Y-shape.
- PVC pipes: Cut 2-inch Schedule 40 pipes ($10 for 10 ft) into 6-ft sections, then attach horizontal wires or netting.
- Repurposed materials: Use old ladders, fencing, or even sturdy branches lashed to stakes.
Wrapping up and next steps
Trellising your apple trees isn’t just about saving space—it’s about unlocking healthier, more accessible, and higher-yielding fruit with minimal effort. Whether you’re a backyard gardener or a small-scale orchard owner, this vertical framework transforms how you grow, prune, and harvest. Now’s the time to roll up your sleeves!
Ready to elevate your orchard game? Start by gathering your materials, sketch a simple trellis plan, and take the first step this season. Your future harvest—and your back—will thank you! 🍏✨